Dinner for two in about 15 minutes? Is this possible? Oh yeah.
But how?
OK, ok, I will tell you. I buy the gnocchi and the marinara sauce.
Now you know the secret. Don't tell anyone.
Here is how I make this easy baked mushroom gnocchi.
Ingredients:
1 lb potato gnocchi
1 lb mushrooms, sliced
1cup marinara sauce
ricotta cheese
parmesan cheese, grated
2 tablespoons oil
salt
pepper
Directions:
Sautee the mushrooms in 2 tablespoons of oil until golden brown. Season with salt and pepper. Set aside.
Pour the marinara sauce in the same skillet and simmer 5 minutes. Taste and adjust seasoning.
In a large pot bring water to a boil, add salt. Boil the gnocchi until they float (follow the instruction on the package).
Turn on broiler.
Divide cooked gnocchi among 2 shallow baking dishes.
Top gnocchi with the sautéed mushrooms.
Add the marinara sauce.
Add dollops of ricotta cheese.
Sprinkle with grated parmesan cheese.
Broil until golden brown 3-4 minutes.
Garnish with basil leaves.
Enjoy it!
Tags: Baked Mushroom Gnocchi with Marinara Sauce and Ricotta recipe, Baked Mushroom Gnocchi casserole recipe, gnocchi with mushrooms with marinara sauce recipe with pictures
Monday, July 22, 2013
Monday, June 10, 2013
Apple Ginger Shot
I’ve totally fallen in love with juicing!
Last night I made my first apple ginger shot. The first sip felt like all my taste buds exploded! The ginger has a strong kick. Woooow, first you feel the apple and then the ginger. Soooo good, ohhh. Don't sip it, just drink it like a shot that is the best way to drink it.
Next time I will try pure ginger juice. Wish me good luck :-)
Ingredients:
(for 2 shots)
1 large apple
1 piece of ginger (size of thumb)
Directions:
Process the ginger root through the juicer than the apple.
Pour into a glass and serve immediately.
The amount of ginger root you use will depend on your individual taste.
Tags: Apple Ginger Shot recipe, Apple Ginger Shot, Ginger Shot, apple ginger juice recipe
Labels:
Juice
Thursday, May 23, 2013
Orange and Ginger Juice
Since I received my Breville Juicer I am juicing every day. I try everything: fruit juice, vegetable juice, green juice .... so good. I want to drink something healthy and fresh and good.
I am crazy about ginger lately. I make ginger tea, I put it in juice, it is good for cold, tummy pain, nausea .... it has a lot of health benefits.
Spice up your juice with ginger root.
Ingredients:
3-4 orange, peeled
1 inch ginger root, peeled
Directions:
Process the ginger root through the juicer than the oranges.
Pour into a glass and serve immediately.
The amount of ginger root you use will depend on your individual taste.
Tags: fresh orange and ginger juice, breville juicer recipe, healthy juice recipe, healthy juice orange ginger root
Labels:
Juice
Wednesday, March 13, 2013
Goat Cheese, Olive and Pistachio Cake
How about a savory cake today? I know I know it sounds weird, but you have to
give it a try. It is fantastic. Just imagine a slice of soft crumbly bread with all these great ingredients. I know ... delicious.
Have you seen the Little Paris Kitchen with Rachel Khoo? I
love that show.
I watched one of her shows and I knew I have to try her
recipe. She made a Cheese,pistachio and prune cake. You have to watch this episode it's only 4 minutes. You will fall in live with her and her adorable kitchen.
I knew I don’t want the sweet and savoury cake
so I adapted her recipe. It is perfection …. Hmmmm
I made a goat cheese, olive and pistachio cake.
The
cheese I used is a mild semi hard goat cheese called Snofisk. I loved the texture; it is a
little chewy so the cake was really interesting: moist and crumbly cake, chewy
cheese, crunchy pistachios and creamy olives… heaven.
It is to die for. Perfect at room
temperature with yogurt or a glass of kefir.
Ingredients:
2 cups
flour
1
tablespoon baking powder
4 oz soft
goat’s cheese, cut into small pieces (I used Snofrisk)1/3 cup pistachios – raw unsalted
1/2 cup dried pitted olives, chopped – I used Cerignola olives
4 eggs
2/3 cup olive oil
1/2 cup milk
4 tablespoons plain yogurt
1 teaspoon salt
1/4 teaspoon black pepper
Directions:
Preheat
the oven to 350F.
Line a
loaf pan with baking paper.
Mix the
flour, baking powder, goat’s cheese, pistachios and olives in a bowl.
Using a
hand mixer, whisk the eggs until fluffy and pale. Gradually add oil, milk and yogurt. Add salt and black
pepper.
Lightly
fold the flour mixture into the egg mixture without overbeating.
Pour the
batter into the prepared loaf pan.
Bake for 30-40 minutes (when cooked a toothpick inserted
in the center will come out clean.)
Leave to
cool in the pan.
Labels:
Bread
Wednesday, October 24, 2012
My photos on the web - without my permission
Not a happy post today I’m afraid.
It has come to my
attention that my photos are being stolen and used around the web without my
knowledge or approval.
Don't ever think that the photos you take are not good enough. One day you will find your pictures on othe websites, just like I did. And it hurts.
Images are an important aspect of blogging. If you're placing your photographs on the Internet, you'll want to make sure you protect your rights to those images. I learned my lesson. Unfortunately we learn from our mistakes. I will copyright my photos, I will watermark them I will do whatever it takes. I am not a pro, but I love to take pictures and I don’t want anybody to use them without my permission.
I have 3 blogs, one of them is Scarsdale Diet Recipes. Pictures from my blog are on different sites.
Here is my post: http://scarsdaledietrecipes.blogspot.com/2011/06/tuna-salad.html
Here is one website that used my photo: http://www.de-slabit.com/2012/04/dieta-scarsdale.html
Another website is http://cieloalatierra.wordpress.com/2012/08/31/viernes-de-dietas-dieta-scarsdale/
Another one: http://www.guidaconsumatore.com/diete/dieta-scarsdale.html
Another one: http://www.dietascardale.net/3/menu-semanal-de-la-dieta-scarsdale
Another one: http://it.paperblog.com/la-dieta-scarsdale-927010/
So I now need to rethink what I’m doing, and whether to
keep doing the blog or not. I didn’t post anything for a while because I was
sad and upset. I am sure many of you are working hard to prepare the material
for a blog. Me too. I prepare all the food, I take the photos, I spend time
writing the recipes and when I find my photos on websites or blogs without my
permission, well it hurts. And they don’t even bother to give me credit for my
work with a link to my blog.
I don’t mind that my photos be shared as long as I am
credited, but I have not been credited.
I will contact everyone and I will ask for the photos to
be taken down or to mention my blog by posting a link with my blog.
Any thoughts on the matter would be appreciated.
Sunday, September 23, 2012
Hungarian Chicken Soup
OK. I promised you my Hungarian chicken soup recipe. This is my mom's recipe. I think every family has its own recipe.
Growing up my family used food as a way to share stories, memories and love. Even now, when I eat certain foods I feel like I am that little girl sitting at the table with my brother and my paretnts. It is such a great feeling.
In winter this was the soup I wanted. Nothing beats the winter chill like a steaming bowl of chicken soup.
Ingredients:
2 1/2 lb Stewing Hen (Mature Chicken)
Tags: hungarian chicken soup recipe with pictures, clear chicken soup recipe, hungarian soup recipe, hungarian recipes, chicken soup recipes, husleves recipe, csirke leves recipe
Growing up my family used food as a way to share stories, memories and love. Even now, when I eat certain foods I feel like I am that little girl sitting at the table with my brother and my paretnts. It is such a great feeling.
In winter this was the soup I wanted. Nothing beats the winter chill like a steaming bowl of chicken soup.
Ingredients:
2 1/2 lb Stewing Hen (Mature Chicken)
5 quarts water
1 onion, unpeeled
3-4 cloves garlic
3 large carrots
3 parsley roots
1 small celery root
1 small kohlrabi
small savoy cabbage
1 green pepper
1 teaspoon peppercorns
Directions:
Fill up your stock pot with water (about 5 qt). Just make sure there's enough room to add all of the ingredients.
Cut up the hen and
place cleaned pieces into the cold water (I used chicken breast and neck). Add salt, peppercorns and bring to a simmer.
Don't let it boil. If you want a nice and clear soup you need to simmer it not to boil it. Skim foam from top with a spoon as soon as
it appears. Let it simmer for about 1 hour.
Meanwhile clean the vegetables and cut them in large pieces.
Add all the vegetables and continue to simmer for another 2 hours on the lowest heat.
Adjust the seasoning, add chicken bulion if wanted to enhace the flavor.
Remove the meat and carrots into a bowl and strain the soup through a fine sieve. The soup should be clear and golden. Semolina dumplings, thin noodles or small dumplings are also added to the soup.
Serve soup hot with fresh ground pepper.
Notes:
An unpeeled yellow onion will make the soup golden.
Never boil the soup, just simmer. Don't put a lid on the pot, cook it uncovered.
Cook the dumplings or noodles in water and add it to the soup. If you cook them in the soup, you will end up with cloudy soup.
Labels:
- Hungarian food -,
Soups
Monday, February 6, 2012
Asparagus Wrapped in Prosciutto and Puff Pastry
Ingredients:
asparagus spears, washed, dried and trimmedpaper thin prosciutto cut in half lengthwise
thawed puff pastry
olive oil
Directions:
Remove puff pastry from freezer and allow to sit for 10 minsPreheat the oven to 400 degrees F. Line a baking sheet with parchement paper.
Wrap half sloce of prosciutto around each asparagus spear.
With a pizza cutter, slice the puff pastry into 1/2 wide strips.
Wrap puff pastry around the asparagus.
Arrange wrapped spears in a single layer on a baking sheet.
Bake for about 25 minutes in the preheated oven, or until asparagus is tender, prosciutto is crisp and puff pastry is golden brown. Serve immediately.
Note: Prosciutto is salty enough, so you don't need to season with salt.
You can brush the puff pastry with egg wash and sprinkle with garlic powder and parmesan cheese.
Tags: asparagus wrapped in prosciutto and puff pastryrecipe, puff pastry prosciutto wrapped asparagus, asparagus prosciutto recipe, asparagus prosciutto appetizer
Labels:
Appetizers
Thursday, February 2, 2012
Liebster Blog Award nr. 2
This is unbelievable: another Liebster Blog award from Prathibha - http://cook-ezee.blogspot.com/
Travelling and Cooking - http://helengrtravelling.blogspot.com/
My Food Affair - http://myfoodaffair.blogspot.com/
Tested and Tasted - http://testedandtasted.blogspot.com/
Holly goes Lightly - http://www.goeslightly.com/
Cooking Manu - http://cookingmanu.blogspot.com/
Prathibha thank you again for the nomination.
What can be better than one Liebster award??? the correct answer is 2 Liebster awards. Yes I got two in a week.
Actually this was the first award I got, but I didn't see it on Prathibha's blog, only after a few days.
So I have to nominate another 5 blogs. I will choose 5 bloggers with no Liebster blog awards. This is what I did yesterday when I got the first award.
'Liebster' means favourite
or dearest in German. Rules for accepting the award:
- Thank the person who gave the award and link back to their blog.
- Copy and paste the award to your blog.
- Reveal the 5 blogs you have chosen to award and let them know by commenting on their blog.
- Hope they pass it forward by accepting and awarding it to bloggers they would like to honour
Here are the 5 blogs I follow and recommend to everybody:- Thank the person who gave the award and link back to their blog.
- Copy and paste the award to your blog.
- Reveal the 5 blogs you have chosen to award and let them know by commenting on their blog.
- Hope they pass it forward by accepting and awarding it to bloggers they would like to honour
Travelling and Cooking - http://helengrtravelling.blogspot.com/
My Food Affair - http://myfoodaffair.blogspot.com/
Tested and Tasted - http://testedandtasted.blogspot.com/
Holly goes Lightly - http://www.goeslightly.com/
Cooking Manu - http://cookingmanu.blogspot.com/
Prathibha thank you again for the nomination.
Labels:
- Awards -
Wednesday, February 1, 2012
Liebster Blog Award
Yesterday I received a wonderful surprise from Stephanie http://www.rodeobucket.com/.
First of all I want to thank you for including my blog in your favorites.
This is my first nomination and award and it really made my day. Thank you so much.
Liebster is German and translates to the English word“dearest”or” favorite”.
It’s meant for up-and-coming blogs with less than 200 followers.”
Here are the rules
•Thank your Liebster Blog Award presenter on your blog.
•Link back to the blogger who presented the award to you.
•Copy and paste the blog award on your blog.
•Present the Liebster Blog Award to 5 blogs of 200 followers or less who you feel deserve
to be noticed. (Some say just 3 or more blogs of less than 200 followers each).
•Let them know they have been chosen by leaving a comment at their blog.
After much head-scratching, I finally narrowed it down to five blogs to pass the honors on to. In no particular order:
Discovering in the Kitchen - http://my-greek-cooking.blogspot.com/
The Saucy Gourmet - http://www.thesaucygourmet.net/
Una Semplice Passione - http://unasemplicepassione.blogspot.com/
Simple Cookery - http://simplecookery.blogspot.com/
Mumsfilibaba - http://mumsfilibaba-mumsfilibaba.blogspot.com/
The hardest part was to choose only 5!
Please visit Stephanie's blog http://www.rodeobucket.com/.
Thank you for the award!
Labels:
- Awards -
Monday, January 23, 2012
Manitou's Cake - Caramel Cake
We had an Alaskan Malamute and every time my mom made this cake Manitou was present. When she caramelized the sugar he showed up and he didn’t leave the kitchen until the cake was done. He knew that smell, he knew something good is cooking, and I think he knew the recipe J. He watched my mom making this cake, he wouldn’t leave the kitchen for a second. This was his favorite dessert, and because we don’t know the name of this cake, we named it Manitou’s cake. Now he is watching us from heaven, and every time I make this cake I know he is there with me, waiting for a little piece. I loved him with all my heart.
You can make icing for this cake, we like it with a cup of milk and this is how Manitou would like it too ;-)
Ingredients:
1 cup sugar
1 cup water (to stop the caramelization process)
Put sugar in a small saucepan, with tall sides, and cook over medium heat until it is dark amber.
When color is achieved, very carefully pour in one cup of water.
Whisk over medium heat, for about 10 minutes, until it has reduced slightly and feels sticky.
Set aside, let it cool.
1 cup sugar
100 g oil (I used sun flower oil)
2 cups flour
5 eggs
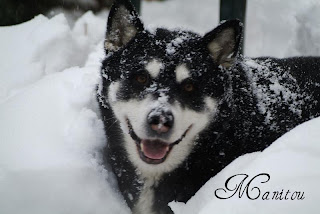
He is Manitou. Look at that big smile :-) He loved to play in the snow. |
1 teaspoon baking powder
1 cup walnuts + 1 teaspoon flour
Preheat oven at 350F.
In a stand mixer fitted with a paddle or whisk attachment, add the sugar and the egg yolks, and mix until thick, fluffy and forms a ribbon. Add caramel syrup, flour, oil and the baking powder to the egg yolk mixture, little by little mixing well.
Beat egg whites in a separate bowl and then fold it in very gently in the mixture.
Pour it in a lined baking sheet. In a small bowl add the walnuts and 1 teaspoon of flour, and shake it well until the walnuts are coated. Shake off excess flour. This will keep the walnuts on top of the cake.
Bake it in a preheated oven for about 25-30 minutes (when cooked a toothpick inserted in the center will come out clean).
Note: If you want the cake to be super moist, reserve about 3-4 tablespoon of syrup and when the cake is baked make some holes in the cake with a toothpick, and pour the caramel syrup with a spoon over the cake.
Tags: Caramel Cake recipe, Caramelized Sugar Cake recipe, prajitura cu zahar ars recipe
Labels:
desserts
Subscribe to:
Posts (Atom)